CICD pipeline for container based workloads
Describe this pattern [1]
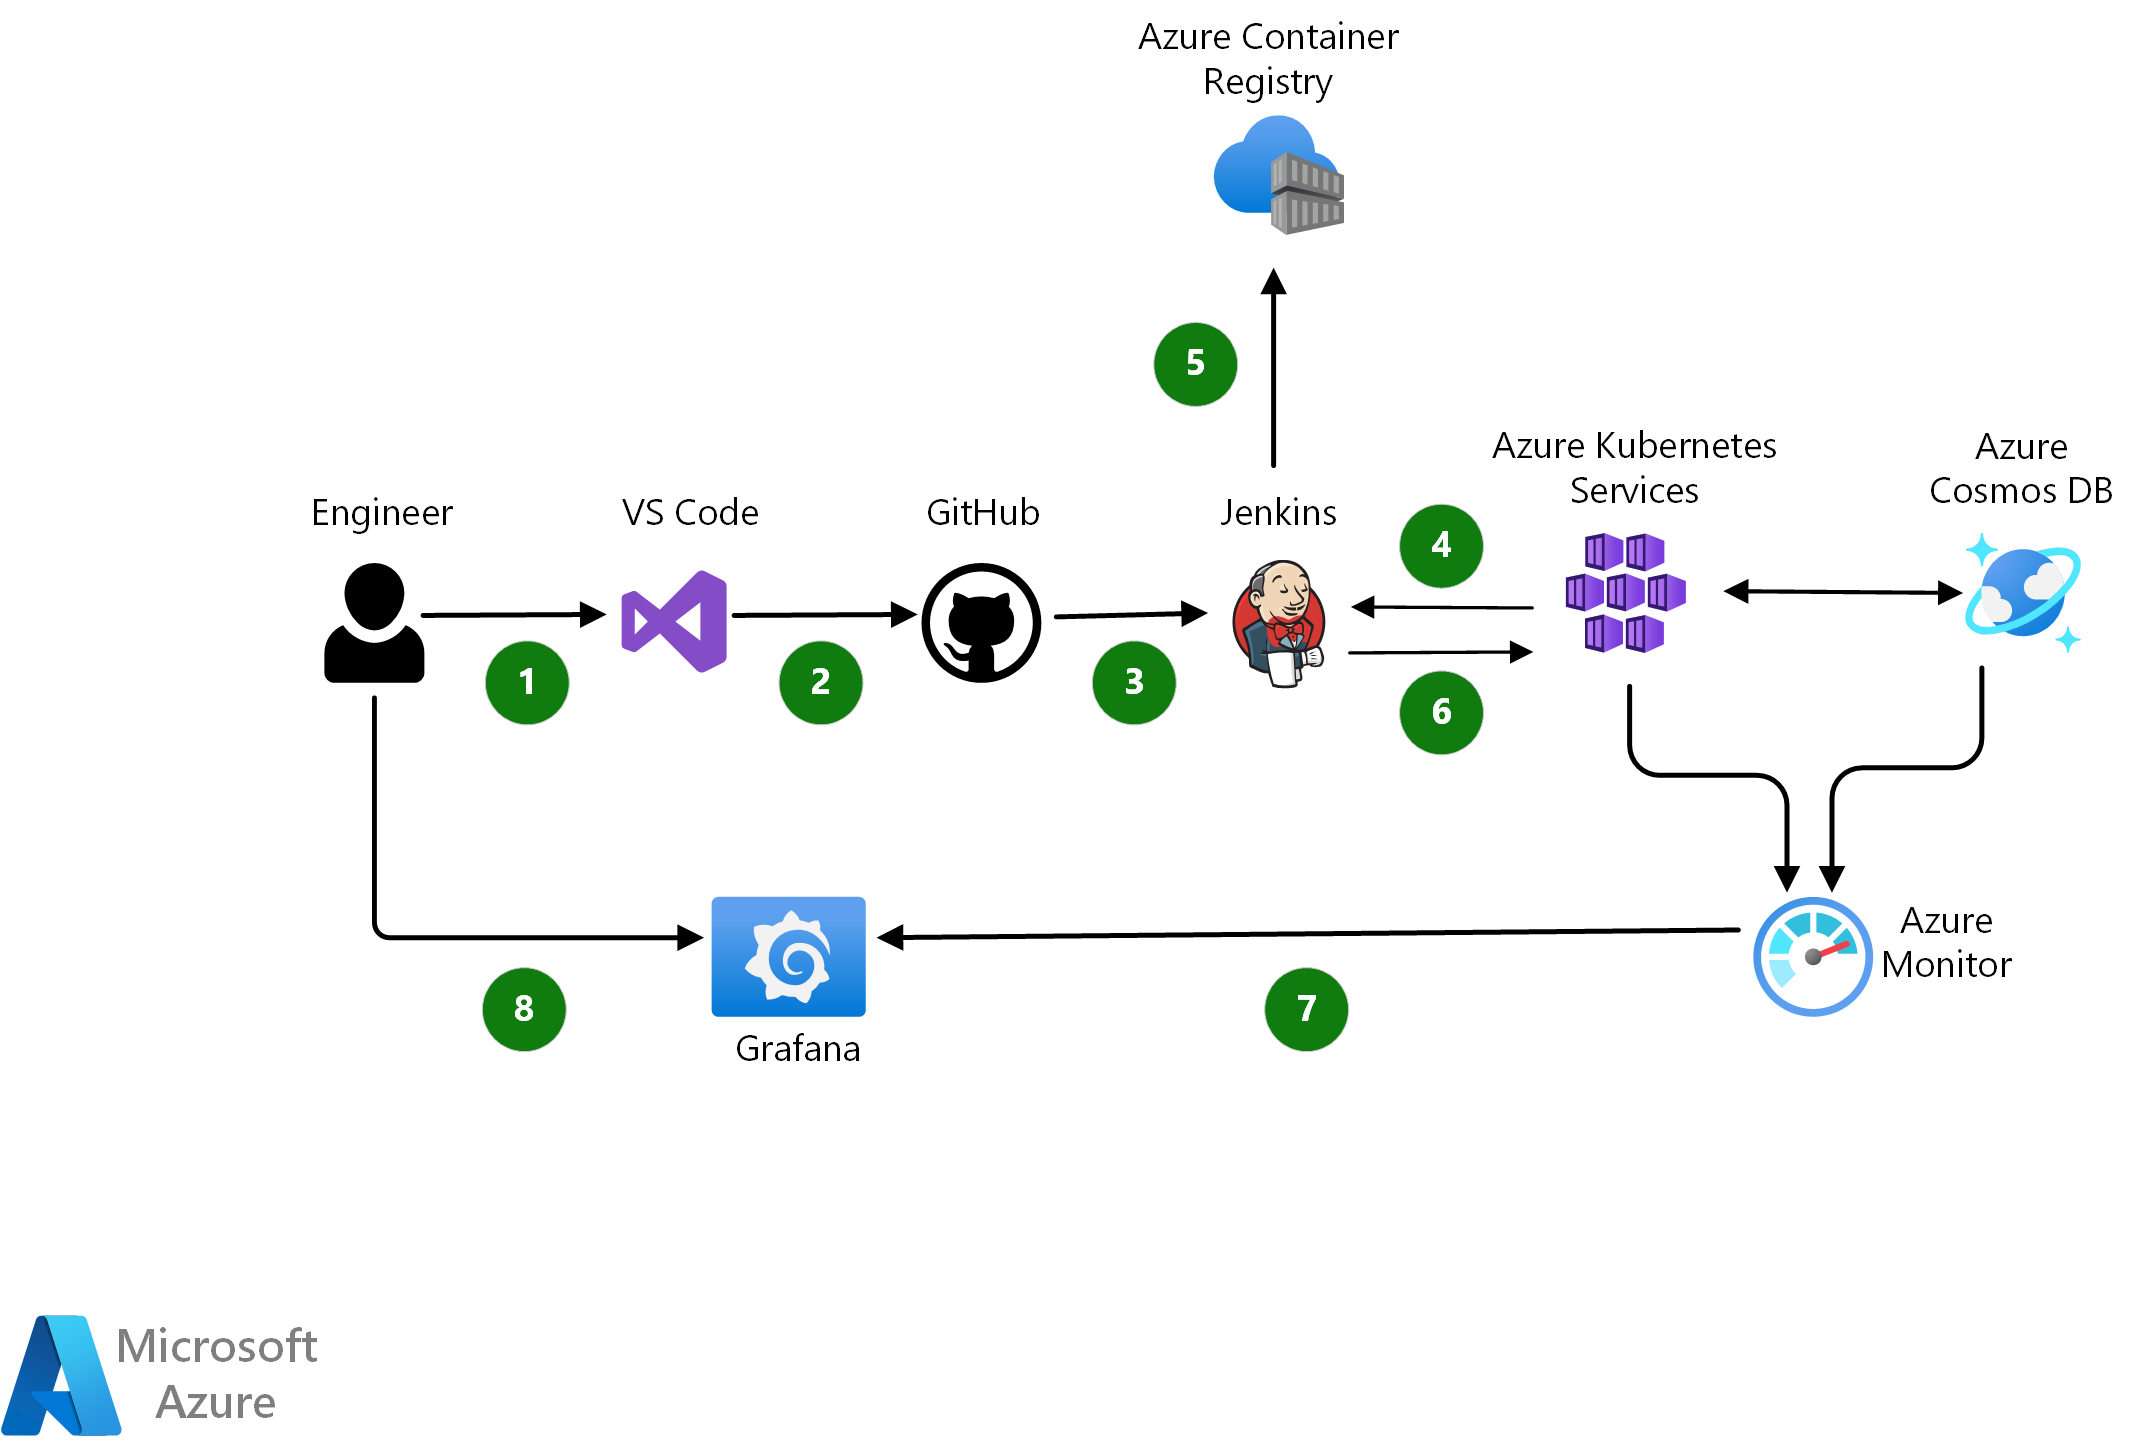
Feature
- In order to know details about this architecture, click above URL.
Implement
1. Make resource from predefined template.
-
Right click the Link: Click Here, and open in the new tab.
-
Login to Azure, then you can see Custom deployment in azure portal.
-
Click azure cloud shell button on the top of the web page.
- After loading Azure Cloud Shell, Type
az ad sp create-for-rbac --name myDevOpsScenario
※ If it says you don’t have sufficiant privilige, ask your owner of subscription to give you Owner role or custom role that has Microsoft.Authorization/roleAssignments/write. Every predefined role don’t have that permition. [2]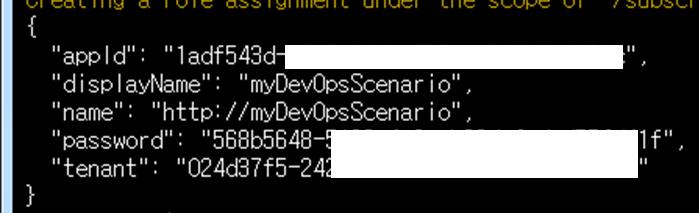
-
Make SSH Key : Type
ssh-keygen -t rsa -b 2048on your cloud shell. Terminal may ask you key name and passphrase. Just type Enter key. -
Find the supported Kubernetes versions for your deployment region :
az aks get-versions -l--query "orchestrators[?default!=null].orchestratorVersion" -o tsv</code> - From now, you can fill on the blanks.
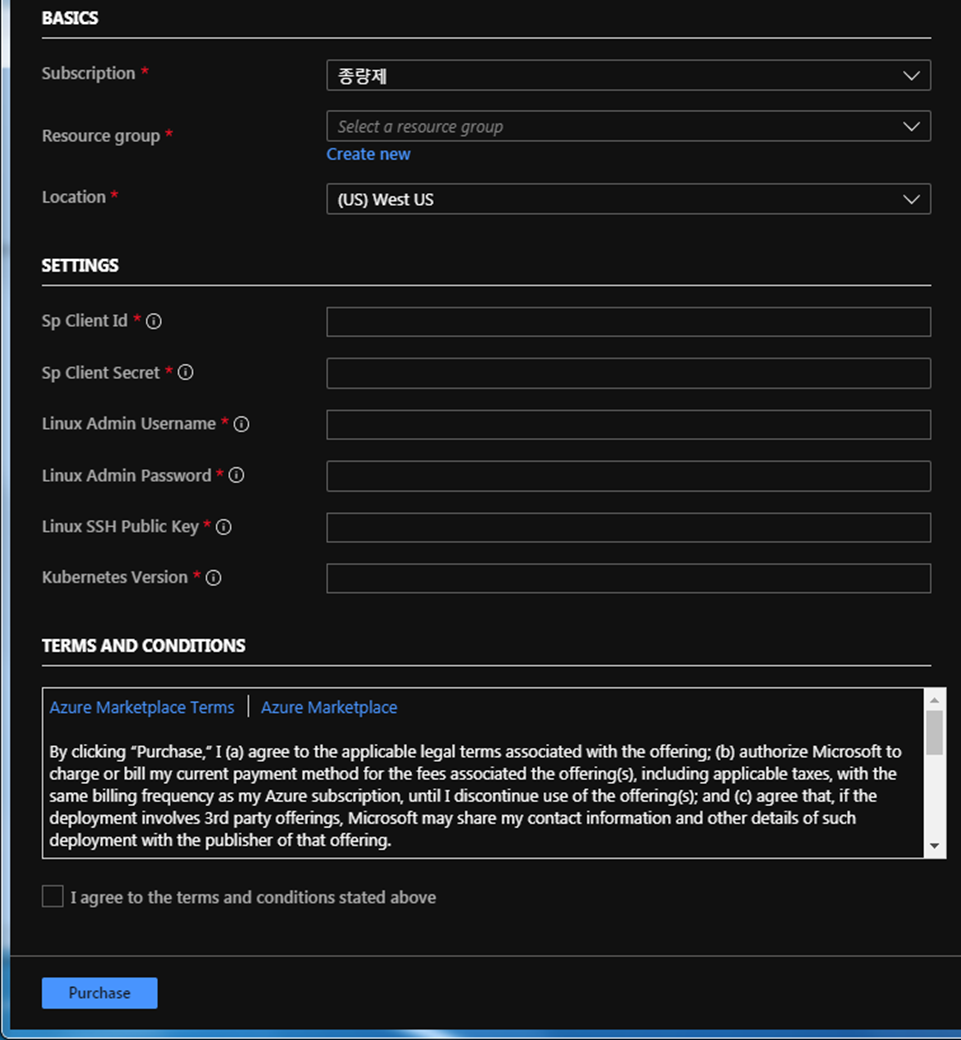
- Sp Clint Id : “appId” of previous step
- Sp Clint Secret : ““password” of previous step
- Linux Admin Username & Password : Now, you should define.
- Linux SSH Public Key : We already make it in previous step. Type the command on cloud shell
cat ~/.ssh/id_rsa.pub - Kubernetes Version : Type as you know.
- Waiting for 20-30 minute.
2. Enter Jenkins Web Page.
- Click Jenkins server on your resource tab in azure portal. And copy public IP Address of jenkins server.
- Type http://(public ip address) on your browser. Than you can see the page like below.

You need to use ssh cli command. When you use linux or MAC environment, you just type command
ssh -L 127.0.0.1:8080:localhost:8080 (your username)@jenkinsg.......sign in your browser. If you use windows environment, you need to install 3th-party ssh tool. - In the lab, I’m going to use git bash to establish ssh connection.
Open git bash terminal - type
ssh -L 127.0.0.1:8080:localhost:8080 (your username)@jenkinsg....... - Now you can connect web console page through forwarded local port. Type http://localhost:8080 on your browser.
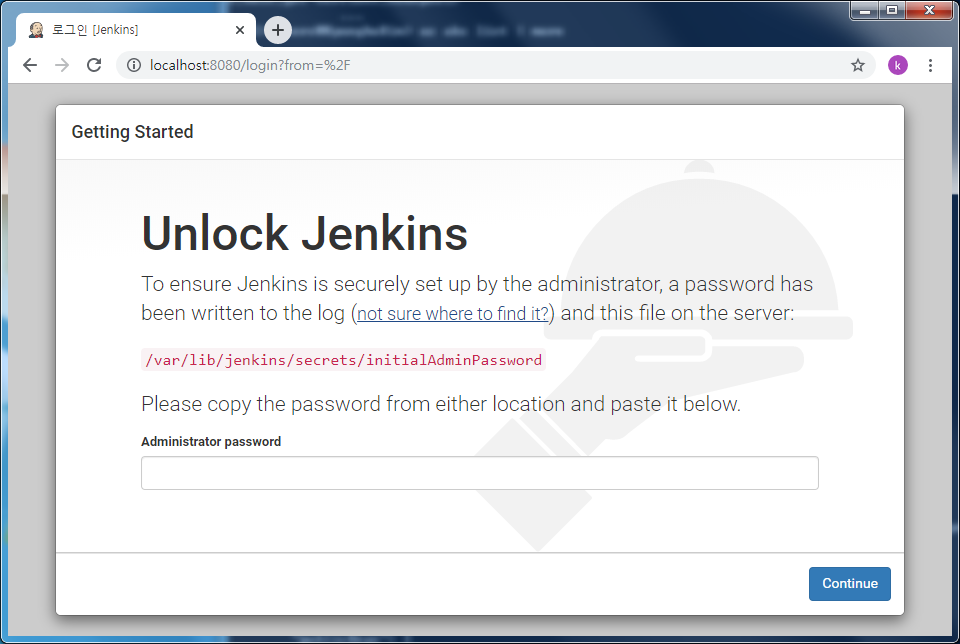
- Then, you will see below page. To unlock jenkins server, Connect to jenkins server on azure cloud shell.
ssh (yourID)@(Jenkins Public IP). Because you generate ssh key in yuor cloud shell environment, you don’t have to type your password. In order to get password for unlocking jenkins web console, typesudo cat /var/lib/jenkins/secrets/initialAdminPassword[3] - Create initial admin account and Install suggested plugins. Now, you can see Jenkins Dashboard.
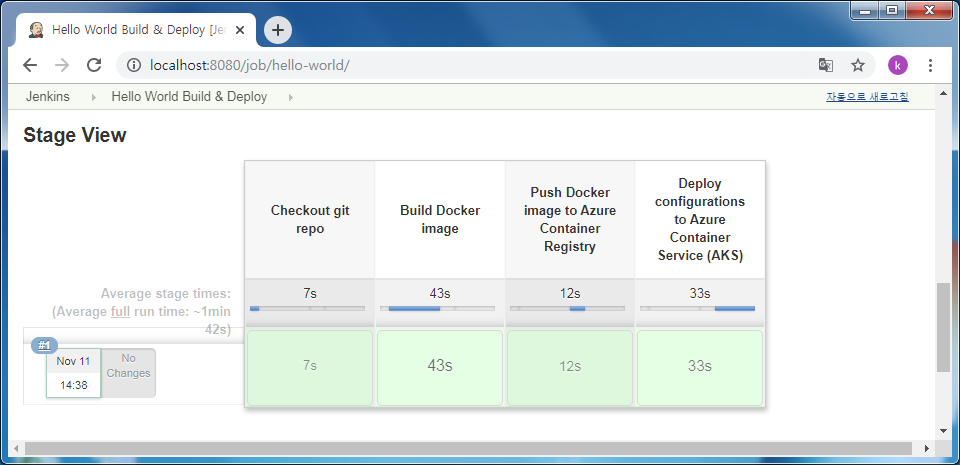
- In main page of jenkins console, click Hello World Build & Deploy link. Then you can see deployed pipeline.
3. Enter Grafana Web Page.
- Reset admin password
- Check public IP address of Grafana VM. Type
ssh (your admin ID)@(Grafana Public IP)on your cloud shell.
sudo -s apt install sqlite3 sqlite3 /var/lib/grafana/grafana.dbupdate user set password = '59acf18b94d7eb0694c61e60ce44c110c7a683ac6a8f09580d626f90f4a242000746579358d77dd9e570e83fa24faa88a8a6', salt = 'F3FAxVm33R' where login = 'admin'
- Check public IP address of Grafana VM. Type
- Enter Web page on your browser : http://(Grafana Public IP):3000
- Login : admin / admin ( Initialized in step “Reset admin password” )
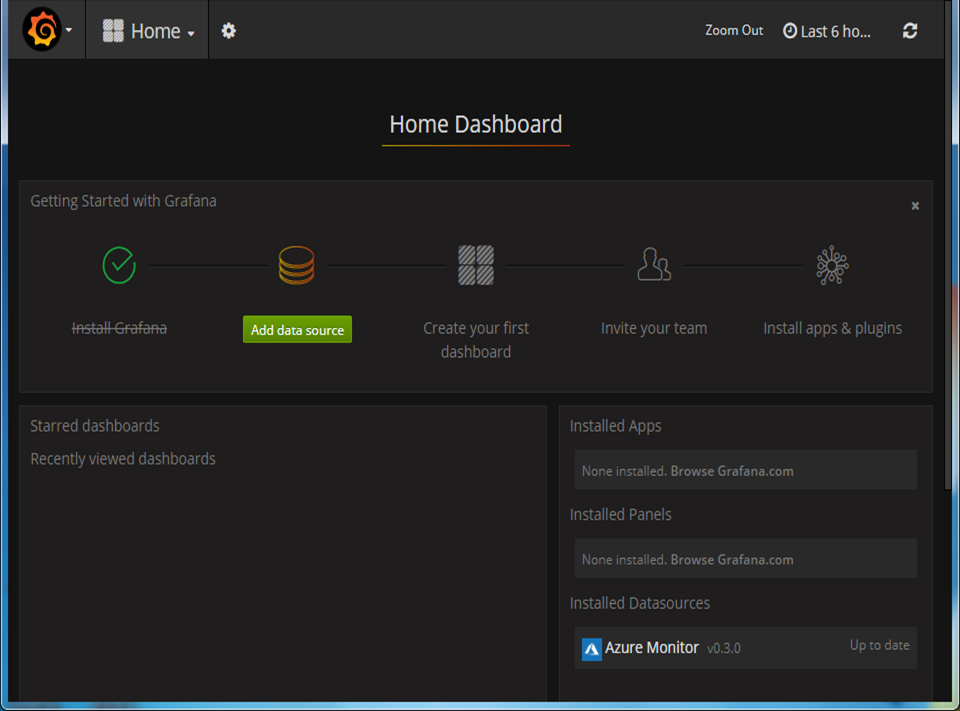
- Now, we can connect to Grafana web page. Data source from azure monitor is already prepared for you.
-
If you want to add Data source
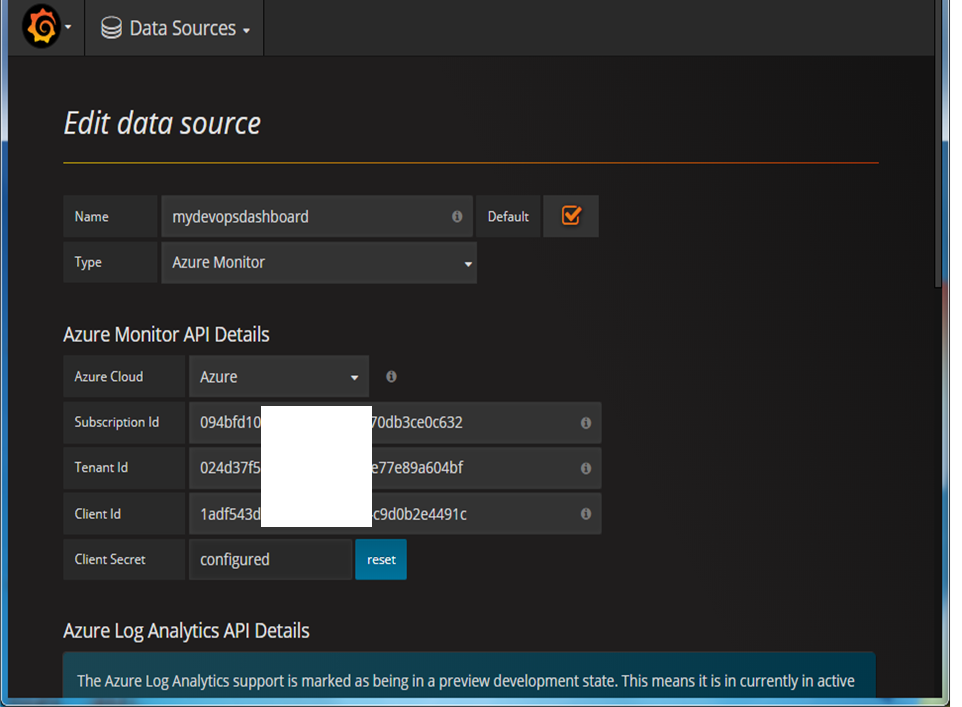 To fill in the blacks, type “ac account list” on your azure cloud shell.
 -
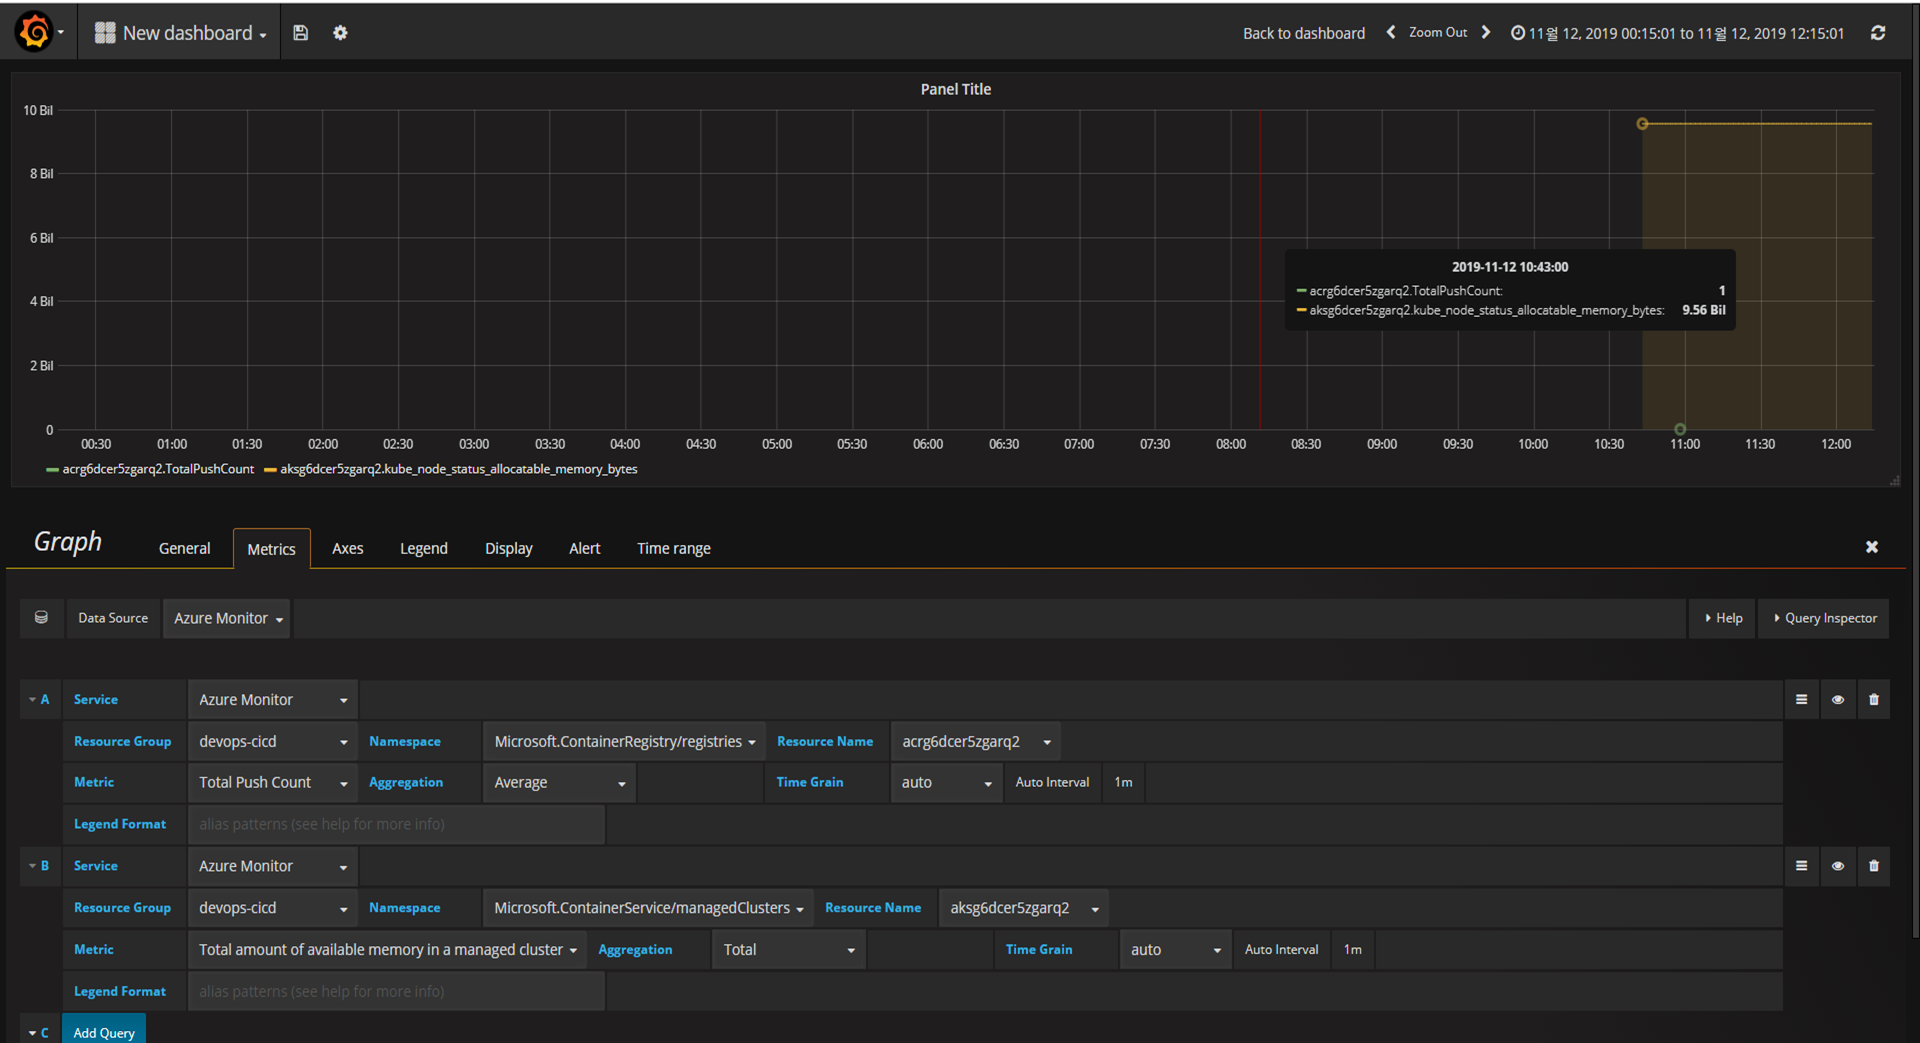
You can make dashboard like below image.
-
4. Make container image in ACR
1) Make development environment
Before login to ACR (Azure Container Registry), you’re supposed to have environment that has docker engine and az cli package.
- Deploy ubuntu server with docker engine in azure.
##############
## RG CREATE ##
##############
loc=                ##### INSERT YOUR VALUE!!!!
rgname=             ##### INSERT YOUR VALUE!!!!

az group create --location $loc --name $rgname

##############
## VM CREATE ##
##############

adminname=          ##### INSERT YOUR VALUE!!!!
vmname=             ##### INSERT YOUR VALUE!!!!

az vm create \
  --resource-group $rgname \
  --name $vmname \
  --image UbuntuLTS \
  --admin-username $adminname

####################
## DOCKER EXTENSION ##
####################

az vm extension set --name DockerExtension --publisher Microsoft.Azure.Extensions --resource-group $rgname --vm-name $vmname


###################
## CONNECT TO VM ##
###################

pip=$(az vm list-ip-addresses --name $vmname | jq ".[].virtualMachine.network.publicIpAddresses[0].ipAddress" -r)
ssh $adminname@$pip
- Install az cli to ubuntu server
sudo -s
curl -sL https://aka.ms/InstallAzureCLIDeb | sudo bash
- Install jq library to ubuntu server in order to use az cli esaily
apt install jq -y
2) Login to az cli with SP
az login --service-principal -u http://((SP name)) --tenant ((your tenant name))
##input SP password
3) Login to ACR
acrname=$(az acr list --resource-group ((your RG name)) | jq -r ".[].name")
az acr login --name $acrname
##Login Succeeded
4) Make docker web application
In this step, I’ll use ASP.NET MVC WEB image. Look at the post [4]
5) Push to the ACR [5]
After done precess that written in the above post
loginsvr=$(az acr list --resource-group ((your resource group name)) | jq -r ".[].loginServer")
docker tag test $loginsvr/azure-asp-net-web:v1
docker images
Then you can see the redefined image with tag “v1”
docker push $loginsvr/azure-asp-net-web:v1
az acr repository list --name $acrname --output table
5. Deploy container to AKS [6]
1) Install the kubernetes cli
az aks install-cli
2) Install the kubernetes cli [7]
aksname=$(az aks list | jq -r ".[].name")
az aks get-credentials  --resource-group ((your resource group name)) --name $aksname
### It will reply that "Merged ((your aks name)) as current context in /home/((your admin id))/.kube/config"

kubectl get nodes
3) Make deployment yaml file
## vi ~/test/azure-asp-net-web.yaml

apiVersion: apps/v1beta1
kind: Deployment
metadata:
  name: azure-asp-net-web
spec:
  replicas: 2
  template:
    metadata:
      labels:
        app: azure-asp-net-web
    spec:
      containers:
        - name: azure-asp-net-web
          image: acrfbfxvhmzjaele.azurecr.io/azure-asp-net-web:v1  ## replce with your ACR name
          ports:
            - containerPort: 80
---
apiVersion: v1
kind: Service
metadata:
    name: azure-asp-net-lb
spec:
  ports:
    - name: http-port
      port: 8080
      targetPort: 80
  selector:
    app: azure-asp-net-web
  type: LoadBalancer
※ If you didn’t replace ACR name in yaml file, pod status would be ErrImagePull or ImagePullBackOff. You should replce it.
4) Deploy to AKS
## create Pod, deployment, and service
kubectl create -f azure-asp-net-web.yaml


## check pod
kubectl get pod

## check service
kubectl get service

## check deployment
kubectl get deployment
5) Connect to web page
kubectl get service
## ---Sample of result ---
## NAME                  TYPE           CLUSTER-IP     EXTERNAL-IP     PORT(S)          AGE
## azure-asp-net-lb      LoadBalancer   10.0.169.133   52.186.27.141   8080:31455/TCP   90s
## hello-world-service   LoadBalancer   10.0.69.140    13.92.82.195    80:30213/TCP     3h32m
## kubernetes            ClusterIP      10.0.0.1       ((none))          443/TCP          3h46m
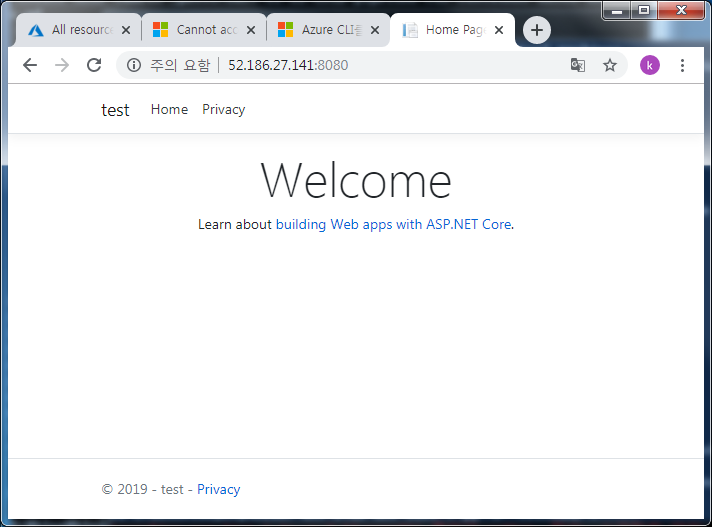
Type in bowser 52.186.27.141:8080 ( IP address will differ with my result, Type your own address )
Additional kubectl commands
## delete deployment
kubectl delete deployment ((deployment name))

## delete service
kubectl delete service ((service name))


## delete pod
kubectl delete pod ((pod name))


## check details
kubectl describe (service|deployment|pod) (name)
6. Continueously manage by Jenkins and github[9]
1) Create a Jenkins Environment Variable
- Click Manage Jenkins - Configure System
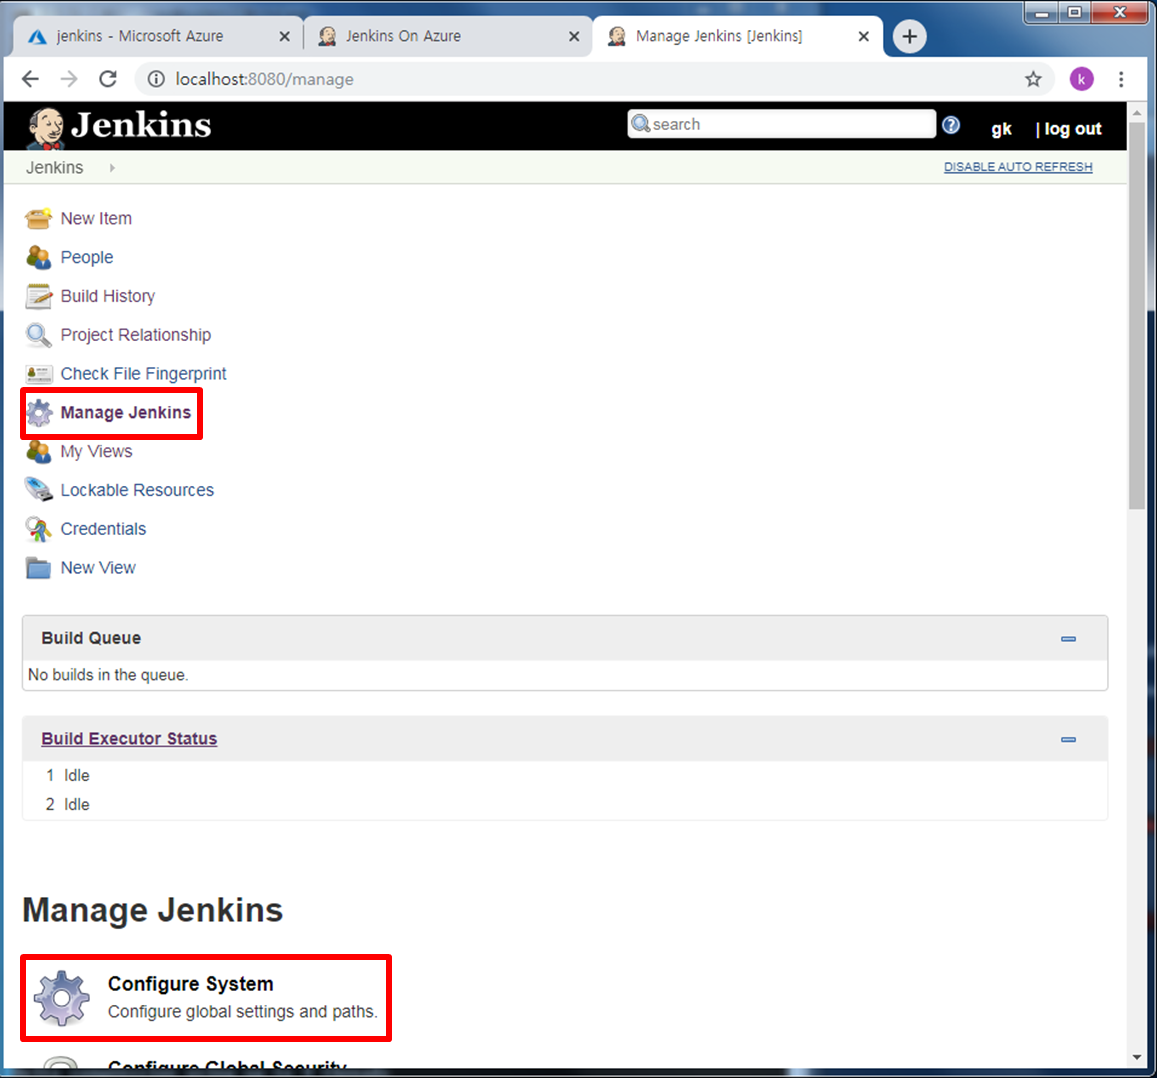
- And then, make a variable for ACR login. (You can see ACR name by typing
az acr list --resource-group ((your RG name)) | jq -r ".[].name")
2) Make a new project
- Since, creating service principal(SP) in Azure and applying ACR credential in Jenkins are aleady done by intial deployment script. So next step is making a new project.
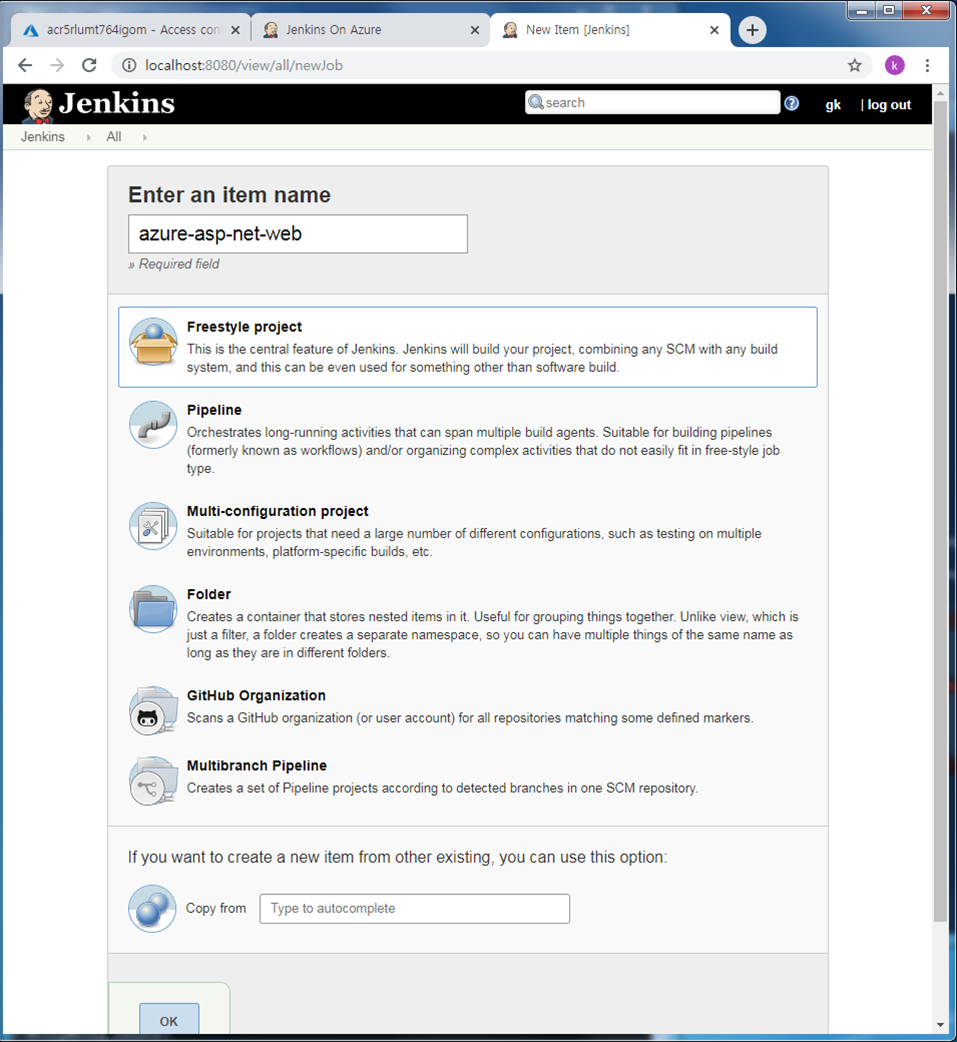
-Click new item on the left side of jenkins web page. Enter an item name as “azure-asp-net-web” and select Freestyle Project.
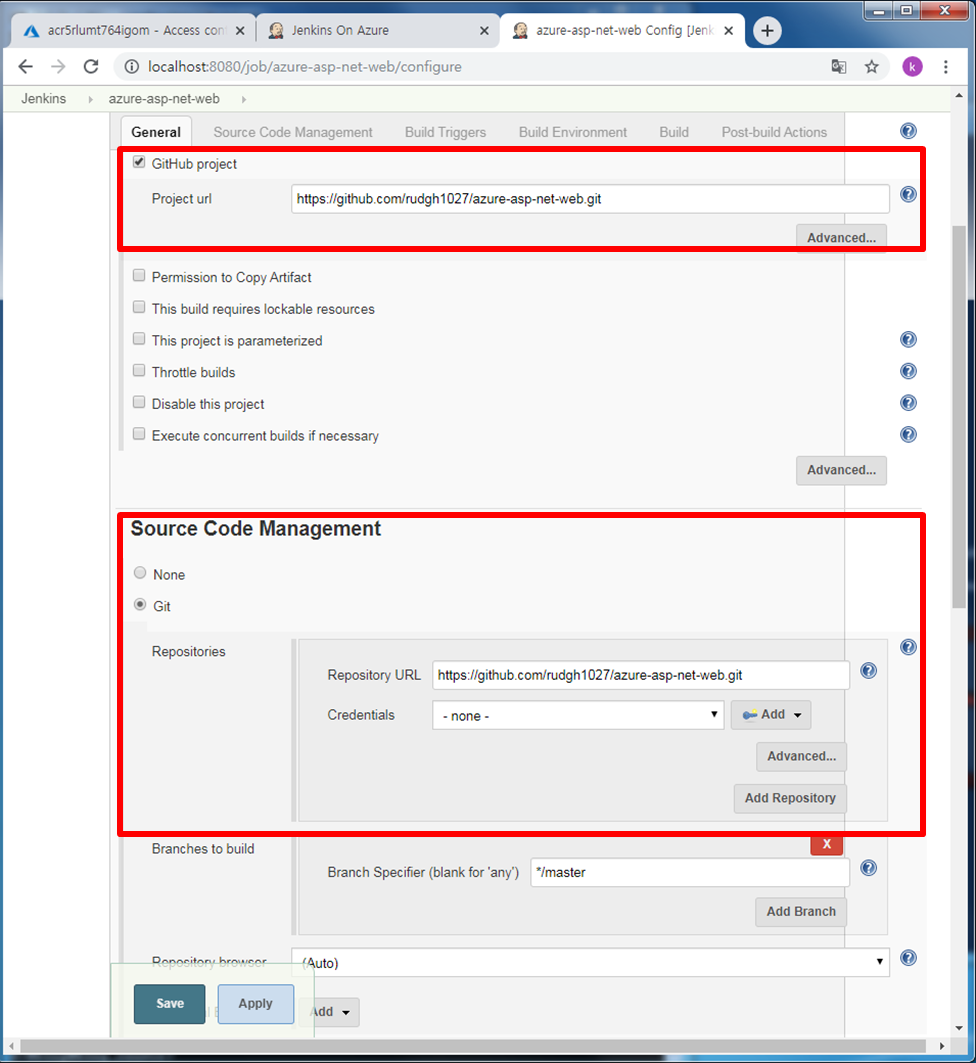
- In the general tab, Click github project and type git repository. I’ll use my sample repository,
https://github.com/rudgh1027/azure-asp-net-web.git. You can use my repository(but, you cannot edit it. It means you cannot test CICD process by webhook.) or use your own repository. Whether folk, clone my repository or push your own reposity by yourself, it doesn’t metter. -
In the source code management tab, select git and repository URL.
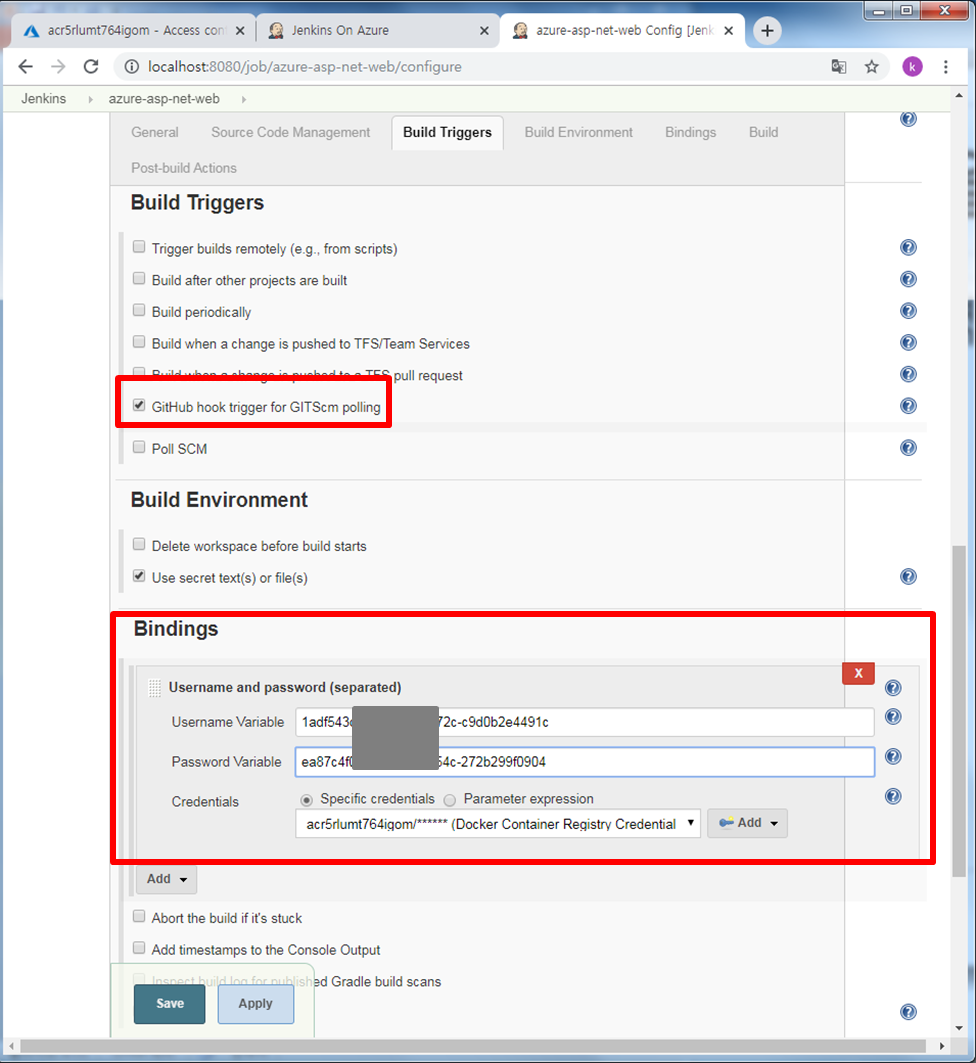
- In the Build Triggers section, select GitHub hook trigger for GITscm polling
- In the Build Environment, select Use secret texts or files
-
In the Bindings, select Add > Username and password (Look for this page’s 1. Make resource from predefined template.)
- Add a Build Step of type Execute shell. Type below test.
# Build new image and push to ACR.
WEB_IMAGE_NAME="${ACR_LOGINSERVER}/azure-asp-net-web:kube${BUILD_NUMBER}"
docker build -t $WEB_IMAGE_NAME ./test
docker login ${ACR_LOGINSERVER} -u ${ACR_ID} -p ${ACR_PASSWORD}
docker push $WEB_IMAGE_NAME
-
Add a Build Step again and select aks deployment. Fill in the blacks like below.
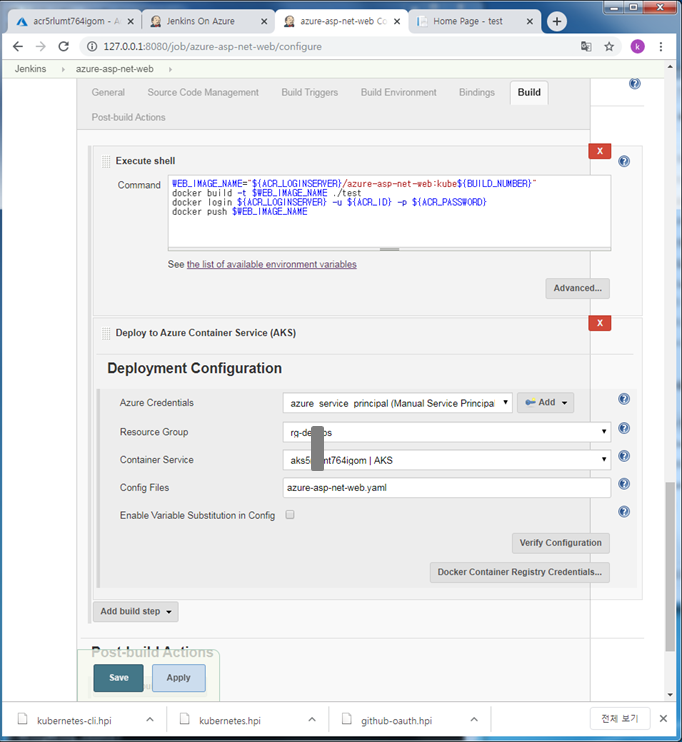
-
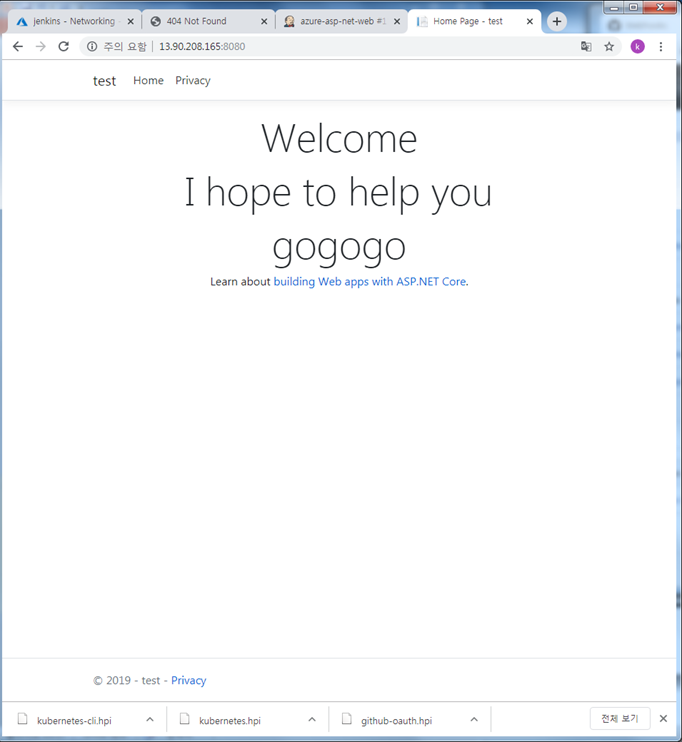
Deployment test
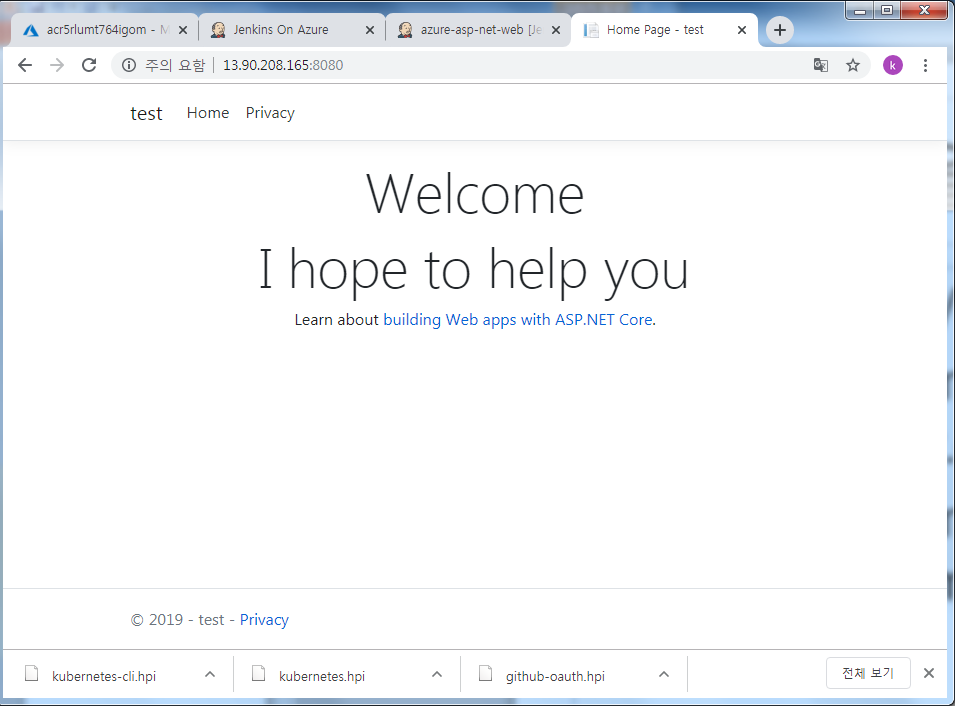
vi ~/test/test/Views/Home/Index.cshtml
## Type <h3 class="display=4">I hope to help you</h3>
vi ~/test/azure-asp-net-web.yaml
## edit deployment tag

- Push into github.
cd ~/test
git add .
git commit -m "edit home index page“
git push –u origin master
- Return to Jenkins web page. Run Build Now. Then, you can see below page.
3) Add webhook
- Browse to your GitHub repository in a web browser. Select Settings, then select Webhooks.
- Add webhook. For the Payload URL, enter http://<publicIp:8080>/github-webhook/
- In azure cloud shell run
az vm open-port --resource-group ((your resource group name)) --name jenkins --port 8080 - Edit your git source, then it will deploy immediatly.
- reference: https://docs.microsoft.com/en-us/azure/architecture/example-scenario/apps/devops-with-aks ↩︎
- reference: https://docs.microsoft.com/en-us/azure/role-based-access-control/built-in-roles ↩︎
- reference: https://docs.microsoft.com/ko-kr/azure/jenkins/install-jenkins-solution-template ↩︎
- reference: https://rudgh1027.github.io/dotnetMVCDeploy ↩︎
- reference: https://docs.microsoft.com/en-us/azure/aks/tutorial-kubernetes-prepare-acr ↩︎
- reference: https://docs.microsoft.com/en-us/azure/aks/tutorial-kubernetes-deploy-cluster#install-the-kubernetes-cli ↩︎
- reference: https://docs.microsoft.com/en-us/azure/aks/tutorial-kubernetes-deploy-cluster#connect-to-cluster-using-kubectl ↩︎
- reference: https://docs.microsoft.com/en-us/azure/aks/jenkins-continuous-deployment ↩︎
- reference: https://docs.microsoft.com/en-us/azure/aks/jenkins-continuous-deployment ↩︎